How to connect external Git repositories
Connecting an external Git repository will enable many features in Infrahub, such as Transformations, Generators, Checks ... that rely on the repository to store code files.
This guide explains how to connect repositories, pull changes, and troubleshoot common issues.
If you want to know more about the differences between these two types, refer to the topic on Repositories.
TL;DR:
- Repository: fully integrates with Git version control, including branch tracking and two-way branch synchronization
- Read-only Repository: links a particular branch in Infrahub to a particular ref in the Git repository. It will only read from the Git repository and never make changes to the external repository.
Most of the time, you will want to use a Repository connection.
Prerequisites
Before you begin, you'll need:
- An Infrahub instance up and running
- Access to a Git repository containing valid Infrahub resources (see Initializing an Infrahub repository)
- A
.infrahub.ymlconfiguration file in your Git repository
- A
- For private repositories and or Read-Write repositories: appropriate credentials or access tokens
- Depending on the method you choose, you may need to install the Infrahub SDK or infrahubctl
If your repository is private or if you want to set up a Read-Write Repository, you'll need to create an access token for authentication.
Depending on your Git provider, the process may vary:
- For GitHub repositories, see the GitHub access token guide.
- For GitLab repositories, see the GitLab access token guide.
Connect a repository
Step 1: Collect repository information
To create a repository connection in Infrahub, you'll need to prepare the following information:
- Name: The identifier you wish to assign to the repository in Infrahub (for example,
My Git Repository) - Repository location: The URL of the external Git repository (for example,
https://github.com/opsmill/infrahub.git)
For Read-only repositories, you will also need:
- Ref: A branch, tag, or commit reference to pull (for example,
main,v1.0, or a specific commit hash)
For private repositories and/or Read-Write repositories:
- Authentication: A username/password combination or personal access token
Step 2: Add the repository
If you are using a personal access token for authentication, you should put the token in the password field of the credential and leave the username field empty.
- Via the Web Interface
- Via infrahubctl
- Via the GraphQL Interface
- Via the Infrahub SDK
- Log in to the Infrahub UI
- Go to Integrations > Git Repositories
- Click on the + Add Git Repository button
- Select the repository type (
RepositoryorRead-only Repository) - Complete the required information:
- Enter the repository name and location (URL)
- Select a credential if connecting to a private repository
- For Read-only Repository, specify the ref to pull
- Add optional description and tags
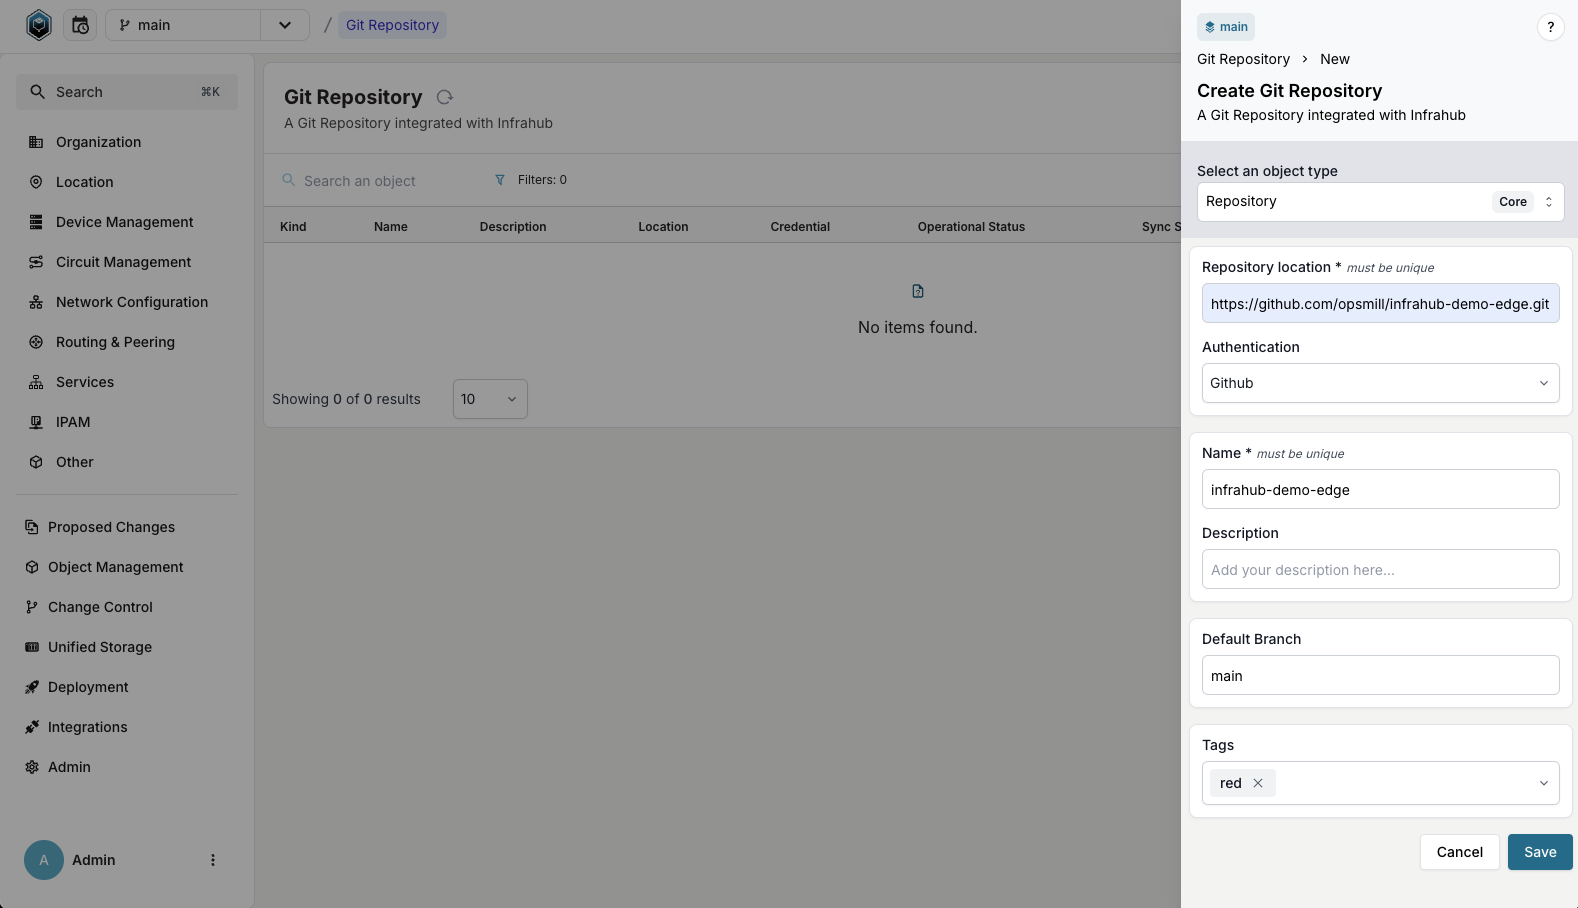
Using the infrahubctl command-line tool, you can add a repository by running the following command:
- Repository
- Read-only Repository
infrahubctl repository add "My Git Repository" "https://GIT_SERVER/YOUR_GIT_USERNAME/YOUR_REPOSITORY_NAME.git" --username MY_USERNAME --password MY_TOKEN_OR_PASSWORD
infrahubctl repository add "My Git Repository" "https://GIT_SERVER/YOUR_GIT_USERNAME/YOUR_REPOSITORY_NAME.git" --read-only --username MY_USERNAME --password MY_TOKEN_OR_PASSWORD
Using the GraphQL API, you can add a Repository or Read-only Repository via mutations.
- Open the GraphQL Interface
Access the sandbox by clicking your user icon in the bottom left corner and selecting GraphQL Sandbox.
- If relevant, create a Credential object with your username and password/token:
mutation {
  CorePasswordCredentialCreate(
    data: {
      name: { value: "my-git-credential" },
      username: { value: "MY_USERNAME" },
      password: { value: "MY_TOKEN_OR_PASSWORD" }
    }
  ) {
    ok
    object {
      hfid
    }
  }
}
- Use one of the mutations below based on your repository type:
- Repository
- Read-only Repository
mutation {
  CoreRepositoryCreate(
    data: {
      name: { value: "My Git Repository" },
      location: { value: "https://GIT_SERVER/YOUR_GIT_USERNAME/YOUR_REPOSITORY_NAME.git" },
      # Optional: name of the Git branch mapped to Infrahub's default branch, where merges are pushed back (default "main"; set your Git default branch name for a non-main default)
      default_branch: { value: "main" },
      # The HFID returned in step 2 will be used for the credentials
      credential: { hfid: ["my-git-credential"] }
    }
  ) {
    ok
    object {
      id
    }
  }
}
mutation {
  CoreReadOnlyRepositoryCreate(
    data: {
      name: { value: "My Git Repository" },
      location: { value: "https://GIT_SERVER/YOUR_GIT_USERNAME/YOUR_REPOSITORY_NAME.git" },
      ref: { value: "BRANCH/TAG/COMMIT_TO_TRACK" },
      # Optional: use the credential created earlier
      credential: { hfid: ["my-git-credential"] }
    }
  ) {
    ok
    object {
      id
    }
  }
}
- If relevant, create a Credential object with your username and password/token:
# Create credential object
credential = client.create(
    "CorePasswordCredential",
    name="My Git Credential",
    username="MY_USERNAME",
    password="MY_TOKEN_OR_PASSWORD",
)
credential.save()
- Create the repository object:
- Repository
- Read-only Repository
# Create repository object
repository = client.create(
    "CoreRepository",
    name="My Git repository",
    location="https://GIT_SERVER/YOUR_GIT_USERNAME/YOUR_REPOSITORY_NAME.git",
    default_branch="main",  # Optional: Git branch mapped to Infrahub's default branch, where merges are pushed back (default "main"; set your Git default branch name for a non-main default)
    credential=credential,  # The credential object created above
)
repository.save()
# Create repository object
repository = client.create(
    "CoreReadOnlyRepository",
    name="My Git repository",
    location="https://GIT_SERVER/YOUR_GIT_USERNAME/YOUR_REPOSITORY_NAME.git",
    ref="BRANCH/TAG/COMMIT_TO_TRACK",
    credential=credential,  # Optional: use the credential created above
)
repository.save()
After creation, your new repository should appear under Integrations > Git Repositories. If the status shows Unknown or an error state, please refer to the troubleshooting section.
Advanced use cases
Update a read-only repository with remote changes
Unlike fully integrated repositories which sync automatically, read-only repositories require manual action to pull in new changes. There are two ways to do this:
- Change the
refproperty: Point the repository to a different branch, tag, or commit hash - Import latest commit: Fetch the latest commit from the remote for the current ref and re-import resources
For more details on how each repository type tracks changes, refer to the Repository Topic.
Change the ref
- Via the Web Interface
- Via the GraphQL Interface
- Log in to the Infrahub UI
- Go to Integrations > Git Repositories
- Click on the
CoreReadOnlyRepositoryrecord you want to update - Click on the Edit Read-Only Repository button
- Update the
reffield with the new branch, tag, or commit reference to pull - Click Save to apply the changes
- Open the GraphQL Interface
Access the sandbox by clicking your user icon in the bottom left corner and selecting GraphQL Sandbox.
- Execute the update mutation with the new ref value:
mutation {
  CoreReadOnlyRepositoryUpdate(
    data: {
      hfid: ["My Git repository"],
      ref: { value: "BRANCH/TAG/COMMIT_TO_TRACK" }
    }
  ) {
    ok
    object {
      id
      syncStatus
    }
  }
}
After updating the ref, the repository will begin synchronizing. You can monitor the process by checking the repository's sync status, which should change to Syncing and then to In sync when complete. The commit field will also update to reflect the latest commit from the specified ref.
Import latest commit
If the remote repository has new commits on the same ref that your read-only repository is already tracking, you can pull the latest commit without changing the ref. This fetches from the remote, resolves the latest commit for the tracked ref, and re-imports all resources.
- Via the Web Interface
- Via the GraphQL Interface
- Log in to the Infrahub UI
- Go to Integrations > Git Repositories
- Click on the
CoreReadOnlyRepositoryrecord you want to update - Click the More menu
- Select Import latest commit
The repository will fetch the latest changes from the remote, update to the most recent commit on the tracked ref, and re-import resources.
- Open the GraphQL Interface
Access the sandbox by clicking your user icon in the bottom left corner and selecting GraphQL Sandbox.
- Execute the import mutation with the repository ID:
mutation {
  InfrahubReadOnlyRepositoryImportLastCommit(
    data: {
      id: "REPOSITORY_ID"
    }
  ) {
    ok
    task {
      id
    }
  }
}
The mutation returns a task ID that you can use to monitor the progress of the import operation.
After triggering the import, the repository will fetch from the remote and re-import resources. You can monitor the process by checking the repository's sync status and the commit field, which will update to reflect the latest commit from the tracked ref.
Troubleshoot repository connections
If you encounter issues with your repository connections, you can use the following steps to diagnose and resolve them:
-
Check the repository status indicators:
- Admin status: Indicates if Infrahub is actively using the repository
- Operational status: Shows connectivity between Infrahub and the repository
- Sync status: Tracks synchronization operations
For detailed information about what each status means, refer to the Repository Status documentation.
-
View detailed operation logs:
- Log in to the Infrahub UI
- Go to Integrations > Git Repositories
- Select the relevant repository record
- Click on the Tasks tab to view detailed logs of Git operations
-
Use repository actions for advanced troubleshooting:
- From the repository detail view, click the More menu
- Select Check connectivity to verify authentication and connection
- Select Reimport current commit to force reimport without changing the reference
- For read-only repositories, select Import latest commit to fetch and import the latest commit from the remote for the tracked ref
A healthy repository connection should show Online for operational status and In sync for sync status once all operations complete.
GitHub access token
Please refer to the official GitHub documentation for creating access tokens. GitHub offers two types of tokens:
For new repositories, we recommend using the Fine-grained Access Token as it allows more granular control over permissions.
Grant the token permission:
- For a
Repository, grant Read/Write access to the repository content - For a
Read-only Repository, grant Read access only
Now that you have created your token, you can use it to connect your GitHub repository to Infrahub. In this case, you will need to put the token in the password field of the credential and leave the username field empty.
GitLab access token
Please refer to the official GitLab documentation for creating access tokens.
We recommend using a project access token which has the advantage of being scoped to a specific project.
While personal access tokens or username/password authentication might work depending on your setup, we strongly recommend against using them as they are scoped to user accounts rather than specific repositories.
Grant the token permission:
- For a
Repository, select bothread_repositoryandwrite_repositoryscopes - For a
Read-only Repository, select theread_repositoryscope
Now that you have created your token, you can use it to connect your GitLab repository to Infrahub. In this case, you will need to put the token in the password field of the credential and leave the username field empty.
Connecting to a Git server with a private CA
If your Git server presents a certificate signed by a private Certificate Authority (CA), point Infrahub at your CA bundle instead of rebuilding the Docker image:
- Save your CA certificate and every intermediate certificate in a single PEM file, such as
ca-bundle.pem - Mount the file read-only into the
infrahub-serverandtask-workercontainers, for example at/opt/infrahub/tls/ca-bundle.pem, or skip the mount and pass the PEM text through the setting in the next step - Set
INFRAHUB_TLS_CA_BUNDLE=/opt/infrahub/tls/ca-bundle.pemso every component trusts the CA, orINFRAHUB_GIT_TLS_CA_FILE=/opt/infrahub/tls/ca-bundle.pemto scope it to git only; both settings also accept the PEM text itself - Restart your environment
The task worker writes the path as http.sslCAInfo into its git configuration file at startup (INFRAHUB_GIT_GLOBAL_CONFIG_FILE, default /opt/infrahub/.gitconfig), so every clone, fetch and push over HTTPS uses it. The mount and configuration steps for Docker Compose, Docker and Helm are detailed in Trust a private CA.
The bundle replaces the system trust store for git. If Infrahub also connects to Git servers with publicly issued certificates, such as GitHub or GitLab, append the public root certificates to the bundle.
Run docker compose exec task-worker git config --file /opt/infrahub/.gitconfig --get http.sslCAInfo, using the path from INFRAHUB_GIT_GLOBAL_CONFIG_FILE if you changed it: it prints the path of your bundle. Read the file explicitly rather than using --global: Infrahub selects that file through GIT_CONFIG_GLOBAL in its own process only, so an exec shell's --global reads a different file. A repository hosted on your Git server now reaches the Online operational status instead of failing with SSL verification failed.
Disabling certificate verification (not recommended)
Disabling certificate validation is a bad security practice and is strongly discouraged. Only use this option in controlled development environments.
If you absolutely need to disable certificate verification for testing purposes, set INFRAHUB_GIT_TLS_INSECURE=true on the task workers and restart your environment. The task worker sets http.sslVerify to false in its git configuration file, so git skips certificate validation for every HTTPS remote. It takes precedence over INFRAHUB_GIT_TLS_CA_FILE, so a configured bundle can stay in place while verification is switched off. Infrahub owns http.sslVerify and http.sslCAInfo in its git configuration file and rewrites them at every task-worker startup, so a value written into that file by hand does not survive a restart; use the setting instead.
Run docker compose exec task-worker git config --file /opt/infrahub/.gitconfig --get http.sslVerify: it prints false, and Infrahub connects to Git servers without validating their certificates.
Using a proxy server
In some network environments, Infrahub's Git worker containers may need to connect through a proxy server to access external repositories.
This method only works for HTTP(S) connections. SSH connections through proxies are not supported in this configuration.
This process requires building a custom Docker image, which you'll need to rebuild with each Infrahub release.
- Create a Dockerfile with your proxy configuration (update with your actual proxy details):
ARG INFRAHUB_VERSION=latest
FROM registry.opsmill.io/opsmill/infrahub:${INFRAHUB_VERSION}

RUN git config --global http.proxy http://user:password@internal.proxy:8080
- Build the Docker image:
INFRAHUB_VERSION=latest && docker build --build-arg INFRAHUB_VERSION=$INFRAHUB_VERSION -f Dockerfile -t custom/infrahub:${INFRAHUB_VERSION} .
- Using Docker Compose
If you are using Docker Compose, you can override part of your existing docker-compose.yml file to use your custom image. See the official Docker Compose documentation for more details.
- Create a
docker-compose.override.ymlfile in the same directory as yourdocker-compose.ymlfile:
---
services:
  task-worker:
    image: custom/infrahub:latest
- Start your environment using the
docker composecommand.
After restarting your environment, Infrahub should now connect through your configured proxy server.
Customizing Git merge behavior
This configuration applies only to standard repositories, not read-only repositories.
By default, Infrahub performs fast-forward only (ff-only) merges between branches. When merging a branch linked to Git, Infrahub updates the destination branch pointer without creating a merge commit. To maintain consistency or improve auditability, you can configure Infrahub to always create a merge commit.
The configuration process will require a restart of the Infrahub server and depends on your deployment method.
For detailed instructions on how to apply configuration changes to your Infrahub instance, see How to configure Infrahub.
Essentially you will need to set the following environment variables to the desired values:
INFRAHUB_GIT_USE_EXPLICIT_MERGE_COMMIT=<true|false>

# Optional: set user name and email for Git commits
INFRAHUB_GIT_USER_NAME="<git-user-name>"
INFRAHUB_GIT_USER_EMAIL="<git-user-email>"
So in our case, we will set:
INFRAHUB_GIT_USE_EXPLICIT_MERGE_COMMIT=true

# Optional: set user name and email for Git commits
INFRAHUB_GIT_USER_NAME="infrahub-automation"
INFRAHUB_GIT_USER_EMAIL="infrahub-automation@example.com"
Test the merge behavior by merging a branch linked to Git. Infrahub should now create a merge commit in the main branch instead of performing a fast-forward update.
Verification
After completing this guide, you should have successfully connected external Git repositories to Infrahub.
You can verify your repository integration is working by checking that:
- The repository shows an "Online" operational status
- The repository shows an "In sync" sync status
- Branches from your repository appear in Infrahub (for fully integrated repositories)
- Resources defined in your
.infrahub.ymlfile are accessible in Infrahub